A grease separator, also known as a grease trap or grease interceptor, is a device designed to capture and remove fats, oils, and grease (FOG) from wastewater before it enters the drainage system. It is commonly used in commercial kitchens, restaurants, and food processing facilities where grease and oil are prevalent.
Purpose of a Grease Separator
Preventing Clogs: Grease can solidify and accumulate in pipes, leading to blockages in the drainage system. The grease separator traps these substances, preventing them from entering the plumbing.
Protecting Sewage Systems: By intercepting grease and oil, the device reduces the risk of damage to municipal sewage systems and treatment plants.
Environmental Compliance: Many local regulations require grease separators to minimize the environmental impact of wastewater containing FOG.
Reducing Maintenance Costs: Preventing grease build-up in pipes and sewage systems lowers the need for frequent cleaning and repairs.
Improving Hygiene: Proper grease management reduces odors and keeps the kitchen or facility cleaner and more sanitary.
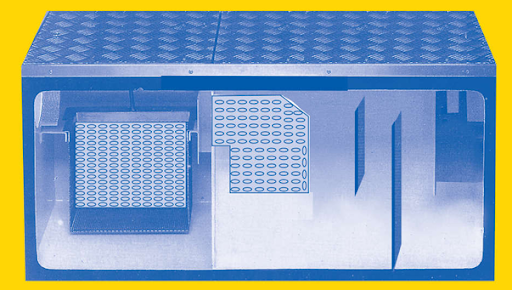
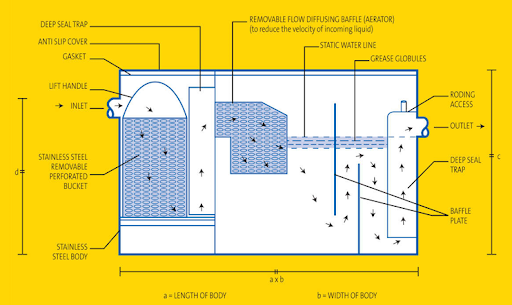
Grease Seperator
Operation:
The Biological Grease Interceptor effectively separates FOG from wastewater by reducing the incoming fluid velocity. Heavier solids settle into a perforated stainless-steel bucket, while grease floats above the water. The system then channels treated water through a baffle plate to ensure no FOG re-enters the main drainage system.
Typical Applications:
Kitchens
Hotels
Restaurants
Fast food outlets
Public houses
Food processing areas
Canteens
Steps for Installing a Grease Separator
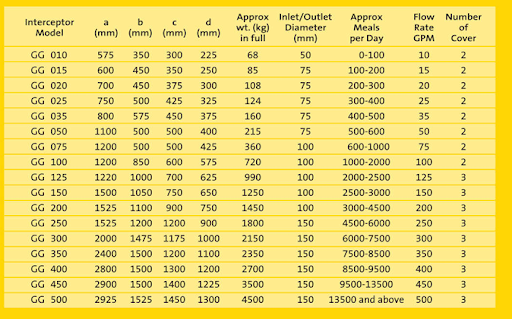
Step 1 - Site Assessment: Determine the volume of wastewater generated (Meals per day) and the level of grease in the discharge to select the right size and model of the grease separator.
Step 2 - Choose the Location: Grease separators are usually installed:
Indoors: Near sinks or dishwashers for small-scale operations.
Outdoors (more Recommended): Install the Grease Trap into the Pit directly for larger setups or facilities generating high volumes of grease. This method is more recommended as it keeps the grease trap surrounding clean.
Step 3 - Connecting to Plumbing: Install inlet and outlet pipes, ensuring proper alignment and slope for gravity flow.
Step 4 - Excavation: Fill in sand after placing the Grease Trap into the pit. The Sand should reach about 2 Inched below the outlet pipe.
Step 5 - Sealing and Testing: Ensure the system is watertight and test for any leaks.
Step 6 - Cover and Accessibility: Install covers or hatches for easy access during maintenance.
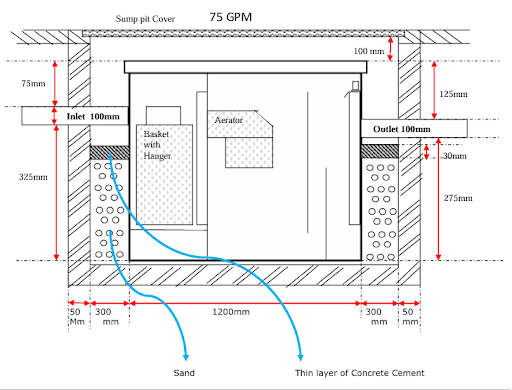
Installation Diagram: Model GT 75 GPM
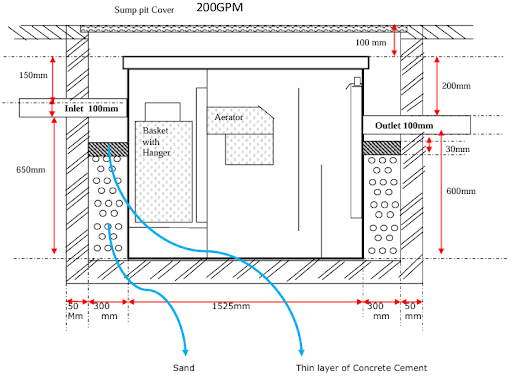
Installation Diagram: Model GG 200 GP
Types of Installations
Above-Ground Installation
Used for small grease traps in kitchens or areas with limited space.
Easy to access and maintain.
Best for low to moderate grease-producing facilities.
Underground Installation (Recommended)
Ideal for large-scale grease separators.
Installed outside the facility, typically underground.
Suitable for restaurants, food courts, or commercial buildings.
Indoor Floor Installation
Installed under sinks or counters for space-saving.
Typically used in small or medium-sized kitchens.
Outdoor Installation
Requires excavation and is designed for high-capacity usage.
Suitable for factories, food processing units, or multiple kitchens in a complex.
Integrated System Installation
Incorporates grease separation with wastewater treatment.
Advanced option for facilities with strict environmental compliance needs.
Models Selection Table
Authorized Dealer for Supply & Installation
Aqua Tank Consultants.
Your trusted partner in delivering GREASE GUARDIAN products and solutions.
Office:
Aqua Tank Consultants,
1 SOON LEE STREET,
#04-69 PIONEER CENTRE,
SINGAPORE 627605.